利用Servlet写一个简易的springMVC
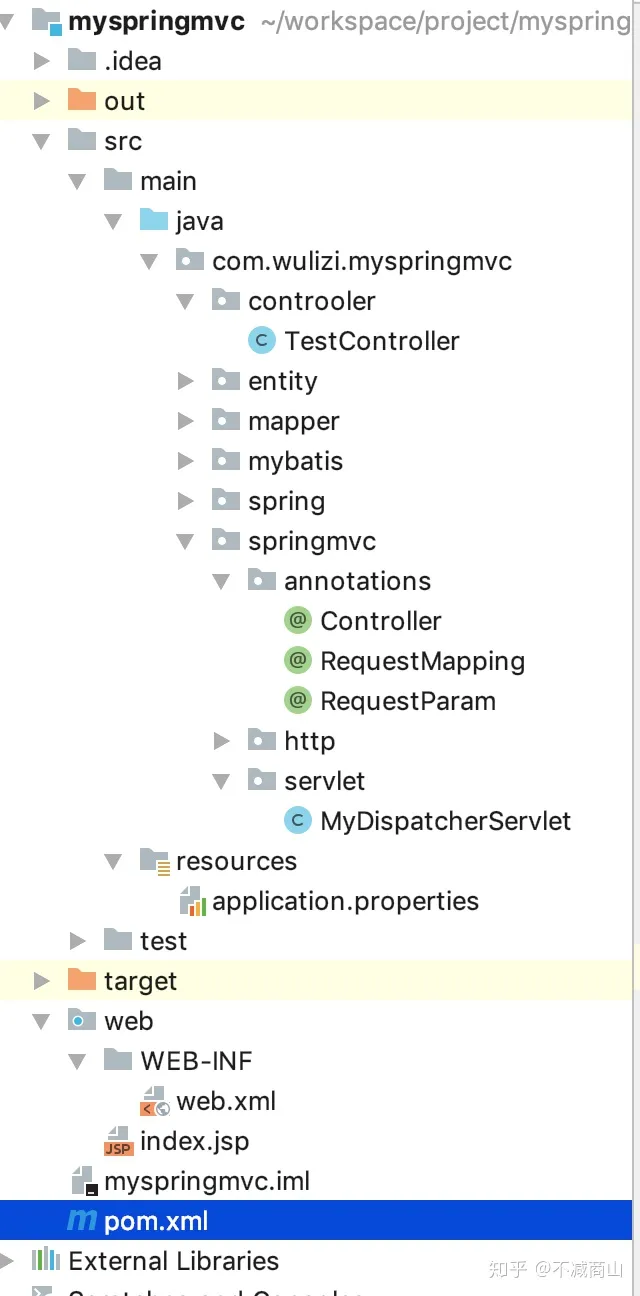
spring mvc的运行原理就不赘述了,首先打开IDEA,创建一个maven的javaWeb项目,具体工程结构图如下:
引入的依赖主要有两个:
<plugin>
                <groupId>org.apache.maven.plugins</groupId>
                <artifactId>maven-compiler-plugin</artifactId>
                <configuration>
                    <source>8</source>
                    <target>8</target>
                    <compilerArgs>
                        <arg>-parameters</arg>
                    </compilerArgs>
                </configuration>
            </plugin>


<dependency>
            <groupId>com.alibaba</groupId>
            <artifactId>fastjson</artifactId>
            <version>1.2.56</version>
        </dependency>
<dependency>
            <groupId>commons-lang</groupId>
            <artifactId>commons-lang</artifactId>
            <version>2.5</version>
        </dependency>
        <dependency>
            <groupId>javax.servlet</groupId>
            <artifactId>servlet-api</artifactId>
            <version>2.3</version>
            <scope>provided</scope>
</dependency>注意plugin里面的内容,<arg>-parameters</arg>代表可以获取参数名称
public void test(String a);如果加了这一行代码,就可以获取test方法的参数名称:a,如果不加,获取的参数名称就是arg0
想要实现自己的mvc框架,就必须继承httpServlet类,类中方法如下:
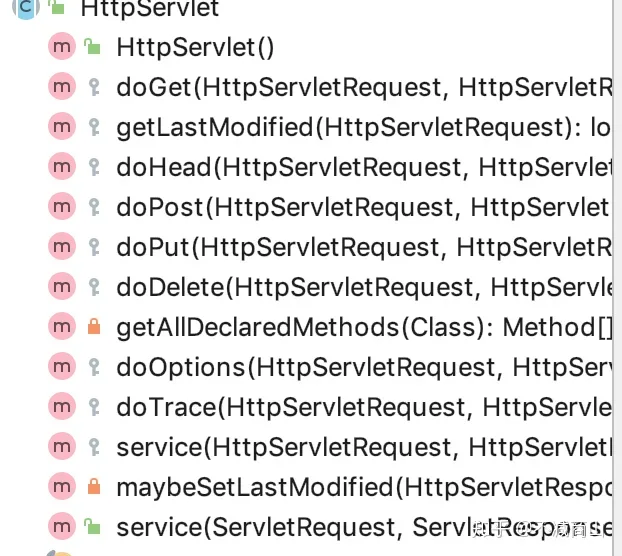
可以看到有doGet,doPost等方法,这些方法的作用就很明显了,当请求进来的时候,不同的请求方式对应了不同方法,先创建spring mvc注解:
Contoller注解
@Target(ElementType.TYPE)
@Retention(RetentionPolicy.RUNTIME)
@Documented
public @interface Controller {
    /**
     * 表示给controller注册的别名
     * @return .
     */
    String value() default "";
}
@RequestMapping
@Documented
@Target({ElementType.METHOD, ElementType.TYPE})
@Retention(RetentionPolicy.RUNTIME)
public @interface RequestMapping {
    /**
     * 表示映射的url
     * @return .
     */
    String value() default "";

    /**
     * 表示提交方式
     * @return .
     */
    RequestMethod method() default RequestMethod.ALL;
}
这里用了一个枚举类来存放不同的提交方式,ALL代表了所有请求都可以映射上,只写了4种
public enum  RequestMethod {
    /**
     * 请求的方式
     */
    POST,GET,PUT,DELETE,ALL
}
@RequestParam
@Documented
@Target(ElementType.PARAMETER)
@Retention(RetentionPolicy.RUNTIME)
public @interface RequestParam {
    /**
     * 表示参数的别名,不填就和参数一致
     * @return .
     */
    String value() default "";
}
注解编写好了以后,我们使用properties文件来当作通用配置文件,在resources文件目录下新建一个applicatuon.properties文件
scanPackage=com.wulizi.myspringmvc里面定义一个包扫描路径,扫描当前项目下所有被@Controller标注的文件
public class Configuration {
    private final Properties properties = new Properties();

    private Configuration() {
        String config = "application.properties";
        try(InputStream in = this.getClass().getClassLoader().getResourceAsStream(config)) {
            properties.load(in);
        } catch (IOException e) {
            e.printStackTrace();
        }
    }
    private static class Holder{
        private static Configuration instance = new Configuration();
    }
    public  static Configuration getInstance() {
        return Holder.instance;
    }

    public Properties properties() {
        return properties;
    }
}
新建一个单例类,用于获取properties
所有的配置都完成了,现在可以编写httpServlet的实现类了。
public class MyDispatcherServlet extends HttpServlet {
    /**
     * 配置文件
     */
    private Properties properties;
    private List<String> classNames;

    /**
     * 存放controller类的map
     */
    private Map<String, Object> ioc;
    private BeanFactory beanFactory;
    /**
     * 枚举类当键,对应不同的请求方式
     */
    private Map<RequestMethod, Map<String, Method>> requestMapping;

    private Map<String, String> controllerMap;

    /**
     * 初始化各种map和list
     * 由于这些map是在初始化的时候就放入了值,在以后都是只读
     * 所以不需要并发包
     */
    public MyDispatcherServlet() {
        //默认容量
        final int initialCapacity = 12;
        this.properties = new Properties();
        this.classNames = new ArrayList<>();

        this.ioc = new HashMap<>(initialCapacity);
        this.requestMapping = new EnumMap<>(RequestMethod.class);

        for (RequestMethod method : RequestMethod.values()) {
            this.requestMapping.put(method, new HashMap<>(initialCapacity));
        }

        this.controllerMap = new HashMap<>(initialCapacity);
    }
构造函数写完以后,就开始写实现:
@Override
    public void init(ServletConfig config) throws ServletException {
        doLoadConfig();
        doScanner();
        doInstance();
        initHandleMapping();
    }
init是httpServlet的初始化方法,需要进行的初始化操作都在里面完成
/**
     * 加载配置文件到properties
     */
    private void doLoadConfig() {
        Configuration config = Configuration.getInstance();
        this.properties = config.properties();
    }

private void doScanner() {
        String packageName = properties.getProperty("scanPackage");
        doScanner(packageName);
    }

/**
     * 加载包扫描的路径
     *
     * @param packageName 包名
     */
    private void doScanner(String packageName) {
        String classEndWith = ".class";
        String packagePath = "/" + packageName.replaceAll("\\.", "/").trim();
        URL url = this.getClass().getResource(packagePath);
        File dir = new File(url.getFile());
       //筛选是.class结尾或者是文件夹的文件
        File[] files = dir.listFiles((d, name) -> name.endsWith(classEndWith) || d.isDirectory());
        assert files != null;
        for (File file : files) {
            if (file.isDirectory()) {
                doScanner(packageName + "." + file.getName());
            } else {
                //去掉文件的后缀
                String className = packageName + "." + file.getName()
                        .substring(0, file.getName().indexOf("."));
                classNames.add(className);
            }
        }
    }

/**
     * 将controller实例放入map中
     */
    private void doInstance() {
        if (classNames.isEmpty()) {
            return;
        }
        for (String className : classNames) {
            try {
                Class<?> clazz = Class.forName(className);
                if (clazz.isAnnotationPresent(Controller.class)) {
                    String tempName = clazz.getAnnotation(Controller.class).value();
                    String beanName = StringUtils.isEmpty(tempName) ?
                            toLowerFirstWord(clazz.getSimpleName()) : tempName;
                    Object classObj = clazz.newInstance();
                    ioc.put(beanName, classObj);
                }
            } catch (ClassNotFoundException | InstantiationException | IllegalAccessException e) {
                e.printStackTrace();
            }
        }
    }

/**
     * 将controller里面的mapping放入到map中
     */
    private void initHandleMapping() {
        if (ioc.isEmpty()) {
            return;
        }

        for (Entry<String, Object> entry : ioc.entrySet()) {
            Class<?> clazz = entry.getValue().getClass();
            if (!clazz.isAnnotationPresent(Controller.class)) {
                continue;
            }

            String baseUrl = "";
            if (clazz.isAnnotationPresent(RequestMapping.class)) {
                RequestMapping mapping = clazz.getAnnotation
                        (RequestMapping.class);
                baseUrl = mapping.value();
            }
            Method[] methods = clazz.getMethods();
            for (Method method : methods) {
                if (method.isAnnotationPresent(RequestMapping.class)) {
                    RequestMapping mapping = method.getAnnotation
                            (RequestMapping.class);
                    String url = mapping.value();
                    if (!StringUtils.isEmpty(url)) {
                        RequestMethod requestMethod = mapping.method();
                        url = (baseUrl + "/" + url).replaceAll("/+", "/");
                        requestMapping.get(requestMethod).put(url, method);
                        controllerMap.put(url, entry.getKey());
                    }
                }
            }
        }
    }

    /**
     * 把字符串的首字母小写
     *
     * @param name 字母
     * @return 首字母小写的字母
     */
    private String toLowerFirstWord(String name) {
        char[] charArray = name.toCharArray();
        charArray[0] += 32;
        return String.valueOf(charArray);
    }
初始化操作完成了,所有的控制器,和控制器方法都放入了map里面,接下来的工作,就是根据请求的url,从map里面取出方法进行反射调用。
@Override
    protected void doGet(HttpServletRequest req, HttpServletResponse resp) throws ServletException, IOException {
        try {
            //处理请求
            doDispatch(req, resp, RequestMethod.GET);
        } catch (Exception e) {
            e.printStackTrace();
            resp.getWriter().write("500!! Server Exception");
        }
    }

    @Override
    protected void doPost(HttpServletRequest req, HttpServletResponse resp) throws IOException {
        try {
            //处理请求
            doDispatch(req, resp, RequestMethod.POST);
        } catch (Exception e) {
            resp.getWriter().write("500!! Server Exception");
        }

    }


/**
     * 合并两个map
     *
     * @param requestMethod 需要合并的map的key
     * @return 合并后的新的map
     */
    private Map<String, Method> mergeMap(RequestMethod requestMethod) {
        //如果方法标记为All,所有请求都可以接受
        Map<String, Method> allMap = this.requestMapping.get(RequestMethod.ALL);
        Map<String, Method> thisMap = this.requestMapping.get(requestMethod);
        //把两个map转换为流,然后合并
        Stream<Entry<String, Method>> combined = Stream.concat(allMap.entrySet().stream()
                , thisMap.entrySet().stream());
        return combined.collect(
                Collectors.toMap(Entry::getKey, Entry::getValue,
                        (oldVal, newVal) -> newVal));
    }


/**
公用的处理器
*/
private void doDispatch(HttpServletRequest req,
                            HttpServletResponse resp, RequestMethod requestMethod) throws IOException {
        Map<String, Method> handleMapping = mergeMap(requestMethod);
        if (handleMapping.isEmpty()) {
            resp.getWriter().write("404 NOT FOUND");
            return;
        }
        String url = getUrl(req);
        if (!handleMapping.containsKey(url)) {
            resp.getWriter().write("404 NOT FOUND");
            return;
        }

        Method method = handleMapping.get(url);

        Parameter[] parameters = method.getParameters();
        //新建一个装参数的数组
        Object[] paramValues = new Object[parameters.length];
        for (int i = 0; i < parameters.length; i++) {
            Parameter parameter = parameters[i];

            //先获取注解,如果没有注解,就使用字段的名称
            String key = StringUtils.isEmpty(getParamKey(parameter))
                    ? parameter.getName() : getParamKey(parameter);
            Class paramClass = parameter.getType();
            //给http两个类赋值
            if (paramClass == HttpServletResponse.class) {
                paramValues[i] = resp;
            } else if (paramClass == HttpServletRequest.class) {
                paramValues[i] = req;
            } else {
                if (!StringUtils.isEmpty(req.getParameter(key))) {
                    String value = Arrays.toString(req.getParameterValues(key)).replaceAll("[\\[\\]]", "")
                            .replaceAll(",\\s", ",");

                    if (paramClass == String.class) {
                        paramValues[i] = value;
                    } else if (paramClass == int.class) {
                        paramValues[i] = Integer.valueOf(value);
                    }
                }
            }

        }


        //取出实例化的controller
        Object parentObj = ioc.get(controllerMap.get(url));
        //将需要被代理的属性封装,动态代理这个方法
        InvokeEntity invokeEntity = new InvokeEntity(
                parentObj,
                method, paramValues, resp);
        ControllerInvokeHandler invokeHandler = (ControllerInvokeHandler) Proxy
                .newProxyInstance(ControllerInvokeHandler.class.getClassLoader(),
                        new Class[]{ControllerInvokeHandler.class},
                        new ControllerInvoke(invokeEntity));
        invokeHandler.invoke();

    }
最后一步可以直接使用method.invoke来调用,但是反射只执行里面的方法,却没有返回值,如果我们需要返回一个实体类,并且序列化成JSON,就做不到这一点,所以我试用了代理去代理这个方法.
反射需要的东西封装一下
public class InvokeEntity {
    private Object parentObj;
    private Method invokeMethod;
    private Object[] invokeArgs;
    private HttpServletResponse response;

    public InvokeEntity(Object parentObj, Method invokeMethod,
                        Object[] invokeArgs, HttpServletResponse response) {
        this.parentObj = parentObj;
        this.invokeMethod = invokeMethod;
        this.invokeArgs = invokeArgs;
        this.response = response;
    }

    public Object getParentObj() {
        return parentObj;
    }

    public Method getInvokeMethod() {
        return invokeMethod;
    }

    public Object[] getInvokeArgs() {
        return invokeArgs;
    }

    public HttpServletResponse getResponse() {
        return response;
    }

}
public interface ControllerInvokeHandler {
    /**
     * 用于动态代理controller的方法
     */
    void invoke();
}
public class ControllerInvoke implements InvocationHandler {
    private Object parentObj;
    private Method invokeMethod;
    private Object[] invokeArgs;
    private HttpServletResponse response;

    public ControllerInvoke(InvokeEntity invokeEntity) {
        this.parentObj = invokeEntity.getParentObj();
        this.invokeMethod = invokeEntity.getInvokeMethod();
        this.invokeArgs = invokeEntity.getInvokeArgs();
        this.response = invokeEntity.getResponse();
    }
    @Override
    public Object invoke(Object proxy, Method method, Object[] args) throws Throwable {
        Object result = invokeMethod.invoke(parentObj,invokeArgs);
        if (result != null) {
            PrintWriter writer = response.getWriter();
            response.setContentType("application/json; charset=utf-8");
            String json = JSONObject.toJSONString(result);
            writer.write(json);
        }
        return null;
    }
}
真正的代理类,在里面反射了method并获取到了返回值,然后再将返回值转成json输出到前端。
使用idea配置一个tomcat,注意需要吧maven的包都导入到WEB-INF
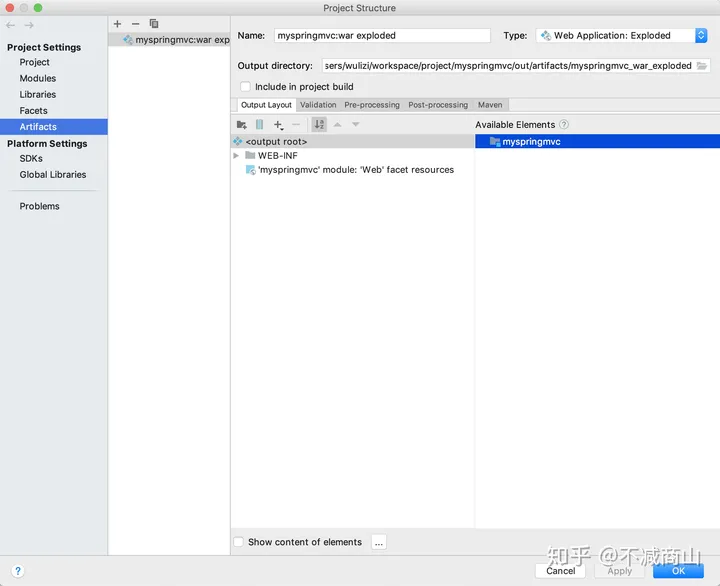
如果有包,右键点击add就行了
最后配置web.xml文件
<?xml version="1.0" encoding="UTF-8"?>
<web-app xmlns="http://xmlns.jcp.org/xml/ns/javaee"
         xmlns:xsi="http://www.w3.org/2001/XMLSchema-instance"
         xsi:schemaLocation="http://xmlns.jcp.org/xml/ns/javaee http://xmlns.jcp.org/xml/ns/javaee/web-app_4_0.xsd"
         version="4.0">
    <servlet>
        <servlet-name>MySpringMVC</servlet-name>
        <servlet-class>com.wulizi.myspringmvc.springmvc.servlet.MyDispatcherServlet</servlet-class>
        <load-on-startup>1</load-on-startup>
    </servlet>
    <servlet-mapping>
        <servlet-name>MySpringMVC</servlet-name>
        <url-pattern>/*</url-pattern>
    </servlet-mapping>
</web-app>
创建controller
@Controller
@RequestMapping("/test")
public class TestController {
    @RequestMapping("/test")
    public Object test(@RequestParam int id,@RequestParam("name") String na) {
        User user = new User();
        user.setId(id);
        user.setName(na);
        return user;
    }
}
启动服务,输入地址,查看返回

如果您发现该资源为电子书等存在侵权的资源或对该资源描述不正确等,可点击“私信”按钮向作者进行反馈;如作者无回复可进行平台仲裁,我们会在第一时间进行处理!
- 最近热门资源
- 银河麒麟桌面操作系统备份用户数据 123
- 统信桌面专业版【全盘安装UOS系统】介绍 117
- 银河麒麟桌面操作系统安装佳能打印机驱动方法 109
- 银河麒麟桌面操作系统 V10-SP1用户密码修改 102
- 最近下载排行榜
- 银河麒麟桌面操作系统备份用户数据 0
- 统信桌面专业版【全盘安装UOS系统】介绍 0
- 银河麒麟桌面操作系统安装佳能打印机驱动方法 0
- 银河麒麟桌面操作系统 V10-SP1用户密码修改 0

prtyaa 收益393.62元

zlj141319 收益218元

1843880570 收益214.2元

IT-feng 收益209.03元

风晓 收益208.24元

777 收益172.71元

Fhawking 收益106.6元

信创来了 收益105.84元

克里斯蒂亚诺诺 收益91.08元

技术-小陈 收益79.5元